Step by step guide
Especially when you are used to an all-predefined, all-inclusive IDE for Arduino, then getting the 32-bit ARM development environment to work can be challenging. It is more involved to get it going, but with this guide and the convenience plug-ins from sevenwatt.com it is definitely doable.
To setup a fully functional Eclipse IDE we need the following components
- Compilers and linkers, called the Tool Chain.
- Make utility that reads scripts (Makefiles) to tell how to compile and link.
- Some core linux commands, that are not standard in Windows.
- Java Runtime Environment.
- Eclipse IDE C/C++ developers.
- The sevenwatt.com Picos ARM Plug-in for Eclipse.
Items 1, 2 and 3 are normally not a concern on Linux. They are available in the distribution or can be installed as an optional package with one mouse click. Not on Windows. We have to do some more work. At the end of this guide, you have a working Eclipse IDE where you can build an example LPC8xx program.
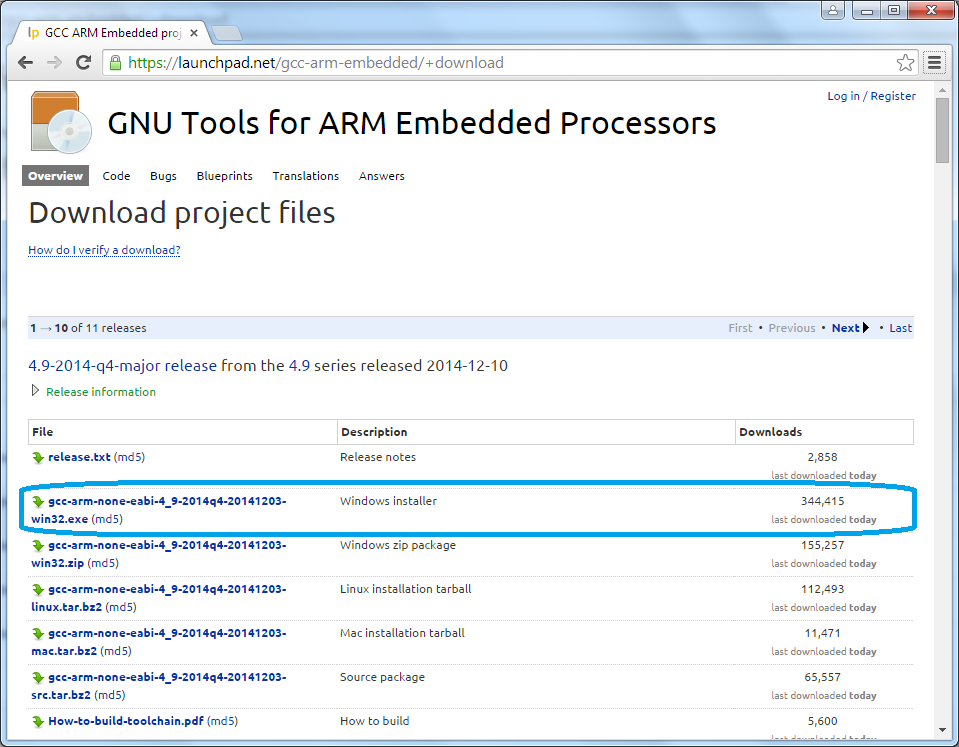
1. Tool Chain
A suitable toolchain is “GNU Tools for ARM Embedded Processors“. Go to the download site and download the “Windows Installer”form the first listed (most recent) toolchain:
Run the installer. Select a language (only for installer itself) and press OK, Confirm to run the installer by pressing Yes. Press Next, and then accept the License, press Next. Install on the default suggested path (do not change), press Next. Press Next once more to start copying and installing files. On the next screen make sure to deselect both “GCCVAR” and “Add path to environment variable“:
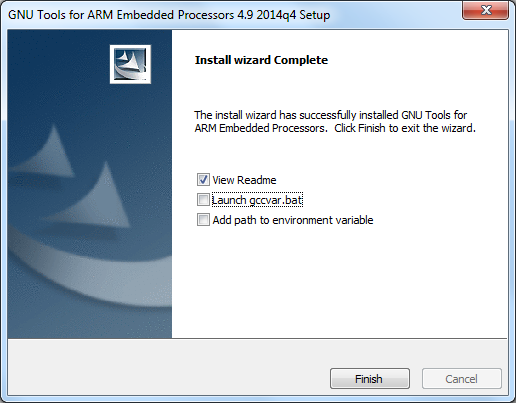
Press Finish, Press Close on the readme pop-up and the toolchain is installed.
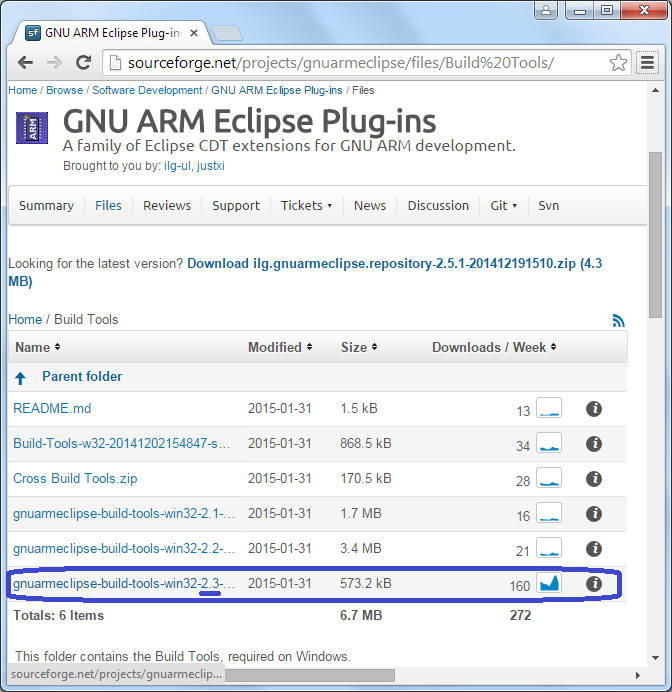
2. Make tool
Various make tools for windows are available. A recent version of make (4.1) is available in the “GNU ARM Eclipse Plug-ins” project. Download version 2.3 of the Windows installer from here:
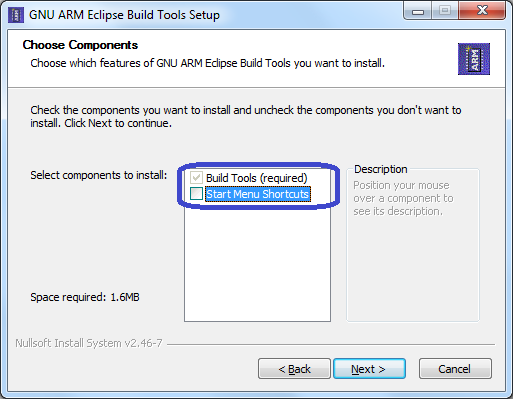
Run the installer. select a language, and press OK. In the installer press Next. Accept the licence by press I Agree. Remove the check-mark at “Start Menu Shortcuts“:
Press Next. Install in the default location (do NOT change), and press Install. After the installation completes press Finish and the make utility is installed. Do not worry about PATH settings.
3. Core/file utilities (supporting MakeFiles)
Some linux commands need to get installed as some MakeFiles make use of them. Most notably is mkdir (Also built-in in windows but not accessible from make in Eclipse). Embello scripts also use uname. Step2 already provided some commands (rm, echo), but others need to be downloaded from GNUWin Core Utils project. This is a direct download.

Run the installer. Press Next in the setup screen. Accept the license and press Next. Install in the default location (do NOT change) and press Next. Uncheck “Documentation“:
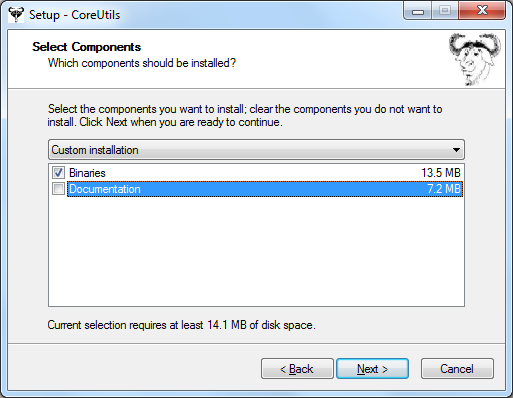
and press Next. Install in the default location (do NOT change), and press Next. Do NOT select additional tasks and press Next again. Finally press Install, After the core utils have been installed press Finish. Now the additional linux commands are available.
4. Java Runtime
Eclipse requires the Jave Runtime Environment (JRE). It may already be installed on a Windows computer. This step can be skipped until it is clear that there is not yet a JRE available.
In this setup we are using JRE 8. It can be downloaded from Oracle. Select the latest JRE (not the SERVER JRE) This is a direct download page for JRE8.
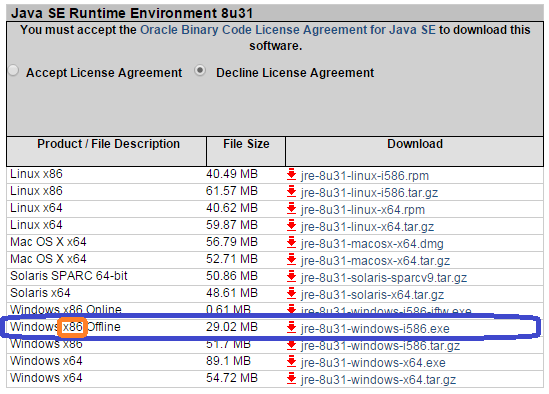
Make sure to select the x86 version marked in orange of the Windows installer. This is the 32-bits version. This is very common, also on 64-bits Windows installations. It is important to select the 32-bits version, as it needs to match with the 32-bits version of eclipse in the next step!
5. Eclipse IDE for C/C++ developers
Eclipse comes in various forms. What we need is eclipse with the C/C++ extensions. It can be downloaded from the Eclipse download page:
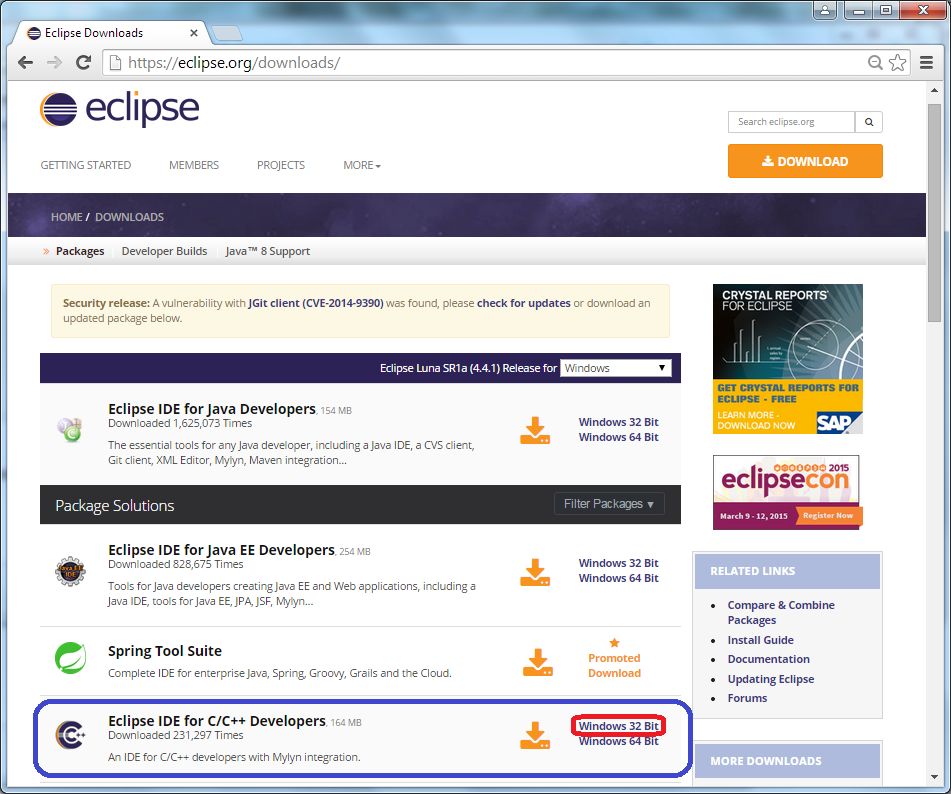
Make sure to select the 32-bit version (marked red) of the “Eclipse IDE for C/C++ Developers” package. It should match the 32-bit version of the JRE of step 4.
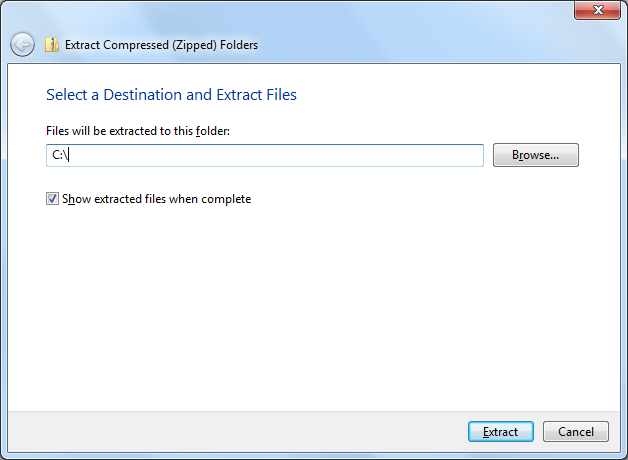
To install eclipse it only has to be unzipped. This can best be done directly into “C:\”, due to a possible limitation of the unzip you are using. A folder C:/eclipse gets created by the unzipping.
It depends on your default unzip tool which step to take, but it can be unzipped with Windows Explorer. Select the eclipse-cpp-luna-xxxx-win32.zip file in explorer. Right-mouse -> Open with -> Explorer -> Extract all files. Enter C:\ as path, and press Extract.
There is no further need to move the unzipped eclipse to another location, but you can do if you dislike programs directly in C:\. The program can now be started by double clicking eclipse.exe in the folder C:\eclipse in an explorer window. For convenience we can first create a desktop short-cut. Select eclipse.exe and Right-mouse -> Create Shortcut. Drag the shortcut to the Desktop.
6. First run of Eclipse
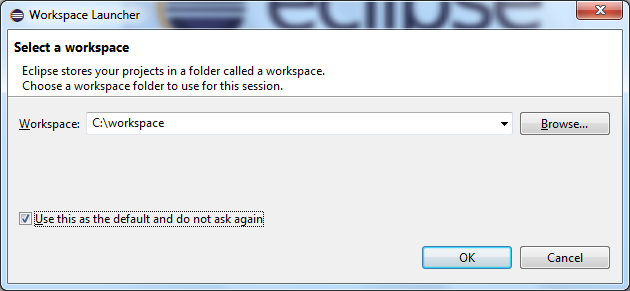
Eclipse can now be started. Double click eclipse.exe or the Shortcut on the desktop. A dialogue pops that will ask for the workspace. Create C:\workspace and for convenience check “Use this as default and do not ask again“.
Press OK. A welcome screen will appear.
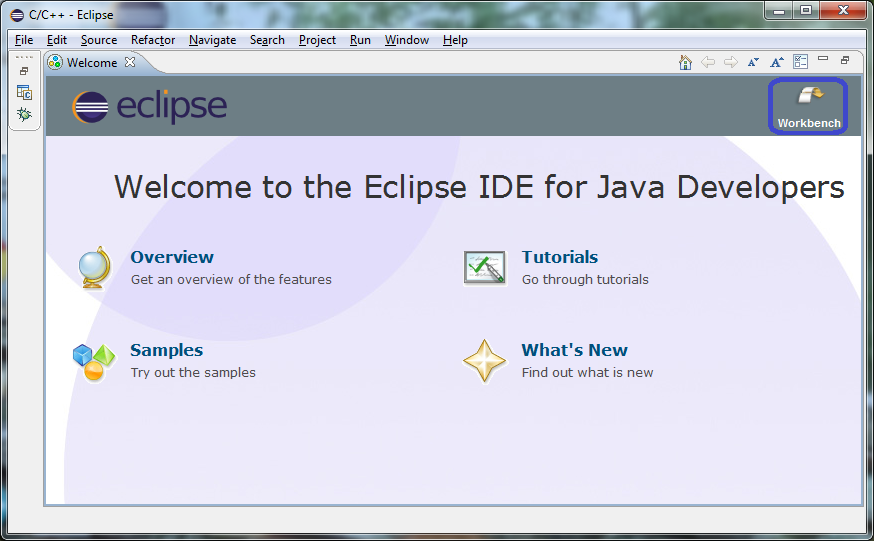
Click on Workbench in the welcome screen. Now we have an empty workbench. It opens up in the so called C/C++ perspective, as indicated by the blue line in the image below. This will be our regular workbench:
Now we have to do one final installment before we can build a demo program:
7. Picos ARM Eclipse plug-in
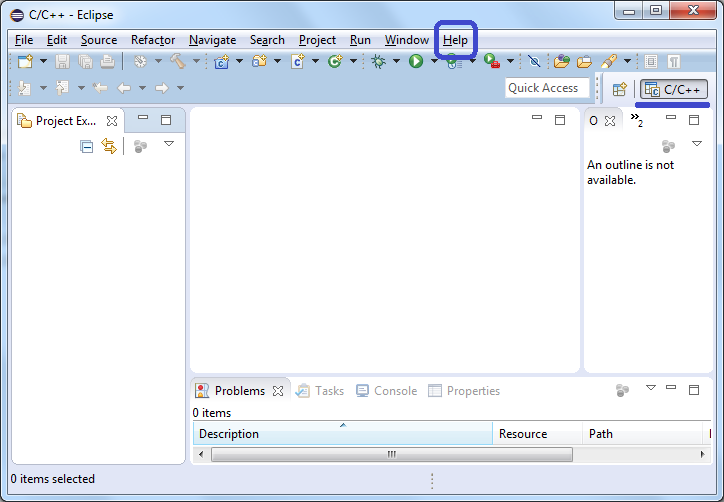
The Picos ARM plug-in provides Jeelabs Embello New Project templates for the LPC810, LPC812 and LPC824. (Further templates are planned). The templates provide ready to run settings for compiler and linker, as well as sample code. Next to this the plug-in provides a configuration tool that figures out the paths to the earlier installed utilities. To install the Picos ARM plugins, we have to go to Install New Software in Eclipse.
Menu Help -> Install New software…
Press Add in upper right corner:
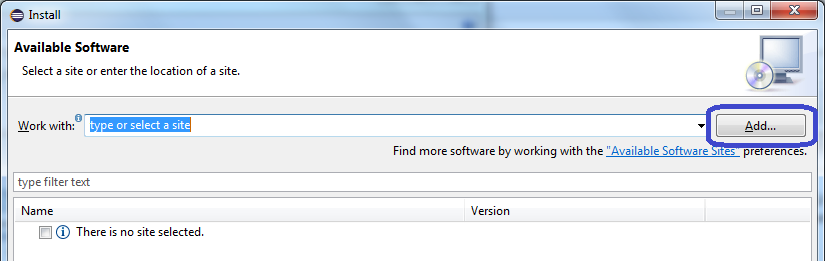
Enter Name: Picos ARM Templates and Tools
Location: //www.sevenwatt.com/eclipse/update
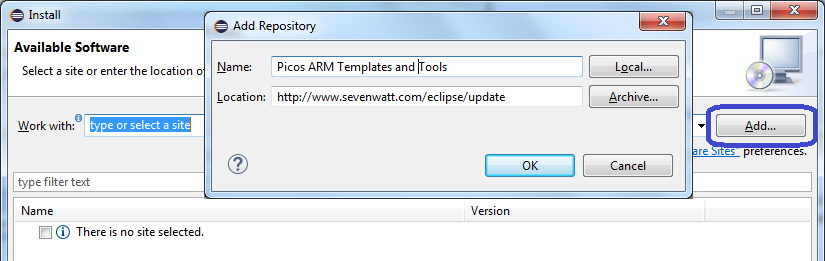
Press OK. Wait a few seconds and check “Picos ARM Tools“:
Press Next. Press Next once more. Accept the license and press Finish. A warning appears indicating that the content of the plugin is unsigned. Press OK, you have to trust me on this :-). After the software installation is finished, Eclipse proposes to restart before the plug-in gets activated. Press Yes to restart.
After the restart, a new main menu item appeared: “Picos ARM“:
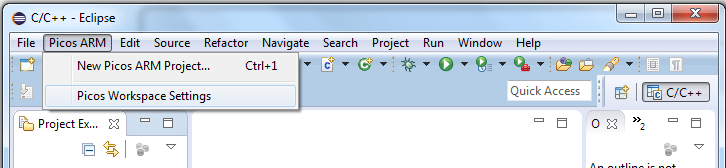
Select “Picos Workspace Settings” from this menu. This menu item start searching for the external tools installed in steps 1, 2 and 3. Normally it finds them within a second:
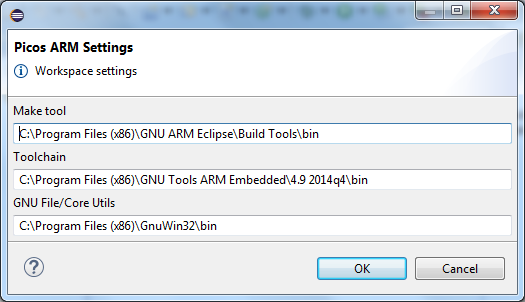
When all three fields are filled, press OK. Now the Eclipse IDE is fully set to start developing Jeelabs Embello applications!
8. Build a demo program
A dedictated New Project Wizard can be used that shows only the Picos ARM templates:
Menu: Picos ARM -> New Picos ARM Project…
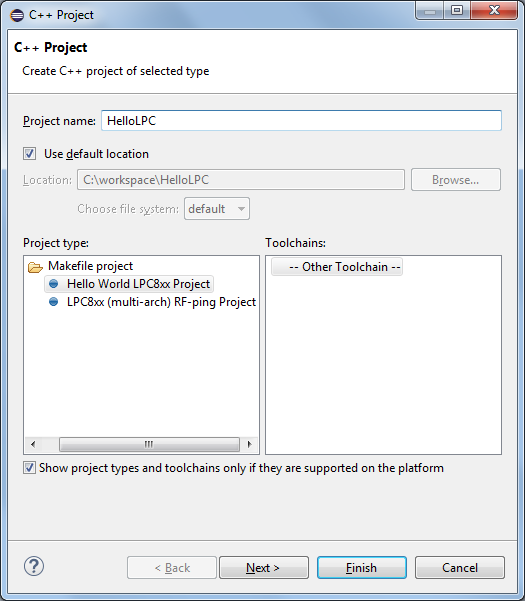
Enter project Name: “HelloLPC” (This name is used in a following step by step guide). Select the (probably default) “Hello World LPC8xx Project” Makefile project. Press Next. Enter an Author and press Finish. No need to fill in other fields. In the project explorer the “HelloLPC” project appears.
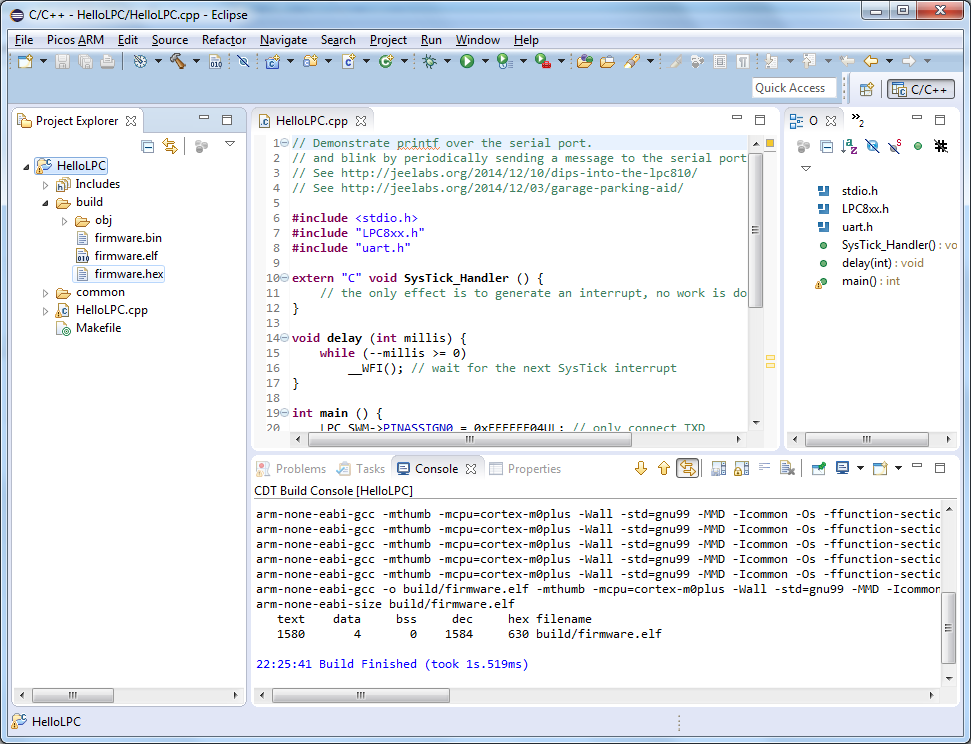
Press the build button in the toolbar (the hammer) and within seconds the first firmware is ready:
It could be that the GDB plugin is not installed. It is supposed to be part of the right version of eclise itself “Eclipse IDE for C/C++ Developers”. Maybe I a wrong. I check soon and test it.
For the moment, can you check on menu Help->Installed software, Tab “installed software” whether it has as entry “C/C++ GDB Hardware debugging”? If not, then it needs to be installed through the menu Help->Install New Software…
In “work with” box enter “http://download.eclipse.org/tools/cdt/releases/8.6”
Give it some seconds to update and then open “CDT Optional Features” and select “C/C++ GDB Hardware debugging”.
Let me know how you proceed. I will check myself later this weekend to see if I missed something.
Are you recommending 32-bit software because you have a 32-bit OS or is it recommended for other reasons? I was wondering because my version of Windows is 64-bit and I noticed that many on these programs have 64-bit versions. Would I be better off using 64-bit software or will it not really make much difference?
Cheers
Hi,
When I tried to add the
Enter Name: Picos ARM Templates and Tools
Location: //www.sevenwatt.com/eclipse/update
gives a error:
Unable to read repository at http://www.sevenwatt.com/eclipse/update/content.xml.
Unable to read repository at http://www.sevenwatt.com/eclipse/update/content.xml.
Received fatal alert: handshake_failure
How can I resolve this problem?
Best Regards,
Tiago
I get the “Received fatal alert: handshake_failure” error message too.
I’m using Eclipse Neon, with Java 8, on a macOS (10.12 Sierra).
Other sites update file (e.g. PyDev), but GNU ARM Eclipse isn’t working for me. Might be a sourceforge issue ?